Assignment Instructions and SW Recommendations
Complete the initial assignment, using TinyMCE/submit. The first assignment outside canvas is hobbies.html. For the later assignments try to do them all on Dreamweaver. But you can use TinyMCE/submit however keep in mind images can be linked from the his page or you will need to be uploaded to your cim home folder in order to use them with TinyMCE/submit.. For TinyMCE/submit. this folder is just /~class/cimw115/assets/filename.
All web page assignments are worth 10points/each.
hobbies.html Tiny MCE - Rich Text Editors (aka DW6)
Permalink - Open Assignment New Window - submit
Rich-Text Web-based Editors
- (i) What is a rich-text editor? Editor with formatting features and WYSIWIG interface, "DW Design Editing Window", - AI
- A code playground allows you to test code, it supplies a very basic IDE (Integrated Developers Environment). An IDE, includes an editor, file manager, and an internal method of testing. Dreamweaver and submit is an IDE. The editor portion, may or may not have a rich-text editor. We will be introducing Adobe Dreamweaver in the next assignment.
- (ii) What is TinyMCE? TinyMCE is the most popular Web-based rich text editors. TinyMCE has both standalone JavaScript and also a cloud version of the editor. The cloud version maintain the editing files.
Using TinyMCE is very similar to using Dreamweaver insert panel. You can duplicate TinyMCE's top ribbon bar, by using the DW left hand grabber bars to move DW dialog panel. Dragging it to the top mimics the TinyMCE ribbon. . However, in the top position, Dreamweaver displays only icons, at the side panel position it display icons with text.
- CkEditor - may be more powerful than TinyMCE.
- Canvas uses TinyMCE for discussion boards. In source code mode you can paste Dreamweaver HTML code into discussion boards. However, the system will usually sanitize CSS and JavaScript code blocks. CSS code needs to be in line.
Web Page Assignment
For this assignments your will be using submit, to create a file called hobbies.html. In the assignment, in your own works answer the two questions above. Then talk about one of your favorite or some of your favorite hobbles. Steps in completing this assignment.
- If the file hobbies.html already exists in your home web folder, submit will insert hobbies.html <body> contents into it's editing pane.
- With submit , when you click upload, TinyMCE editing pane content is copied into your home page hobbies.html file.
- Submit adds a generic <head> tag content to your file, if you want links to external CSS or JavaScript, you must locally edit hobbies.html.
Nota Bene, if you edit the <head> block or add JavaScript to the end of hobbies.html, you will lose this content if you use submit tests a second time.
YouTube Short on <head> and <body> tag.
Login to submit and answer basic questions
- Login to submit, using your SB or IVC username, password is your banner ID (letter A followed by 8 Digits)
- If you are in more than one class of mine, select this class and then select the file hobbies.html. This will take you to the submit web page with a TinyMCE dialog editing pane.
- In your own words answer the two questions, ( i what is a rich-text-editor, ii what is TinyMCE. Make sure you take advantage of some of TinyMCE editing features.
- Also answer these Three questions:
- What are view menu features, view → source code <>; view → preview ; and view → full screen?
- Does the Preview exist in multiple places (check the extended ribbon panel)?
- Does canvas's TinyMCE have preview and source code, hint check bottom of discussion board editing pane?
Canvas does use different Icon images, if you got to extended editing ribbon in submit, you will see the default icons. &eye;
- Put the answers/questions (25 or more words) at the bottom of your page, begin your hobby discussion in the top half. You can be brief on answers, but use own words.
Discuss your hobbies (150 words) use at least 7 capabilities of TinyMCE, including a © line at bottom. - In your hobbies.html at the bottom Insert → Emojis, Insert → Date/Time. with copy right (insert → special character) symbol.
- You will need to discuss a hobby or your hobbies. Looking for 150 words (you can use tools → word count, or notice word count at bottom).
- In the header and main-text make sure you implement at least 7 capabilities of the TinyMCE editing ribbon.
- When finished click the upload to cim button, this will create a web page hobbies.html in your home folder.
Note TinyMCE is just the body of your web-page. Current version of submit doesn't create a link in your home page to hobbies.html.
On Submit notice the location of your CIM home page, it will be of the form protocol://server/folder/file which is https://cim.saddleback.edu/~sbusername/hobbies.html
View Your HTML Source Code
- View → Source code icon is <>
- Notice all CSS code is in-line, they usually sanitize CSS and JavaScript code blocks.
At this stage, not worry too much about HTML tags, we will look at them later.
Images and Test home pages/hobbies.html - You can add images, but you need to link to a public domain image. On most image searches you can select size small, license public domain or free to share. You can upload images to your home folder, but we will not be covering FTP until the next assignment.
HTTP is used to get content from a server. FTP allows one to put content to a server.
The image dialog panel accepts the image path. Nota Bene on canvas, they upload the images and store them in a SQL database.
You should not resize images in a web page, you should always resize images to anticipated size before uploading. It is okay to have both small thumbnail and full size images in a web folder. - You can add relative links, TinyMCE, so you can add a link to your home like <a href="index.html">Home Page</a>, it will work when you upload, bu twill not work in preview.
- Using submit, click the hobbies.html, this will allow you to preview your hobbies.html in your home folder, pay attention to the URL in the web browsers address bar.
In the next assignment, we will be creating your home page and also learning about FTP (file transfer protocol)
Caveats.
index.html Web Page 1 Create CIM Home Page
Permalink - Open Assignment New Window - submit
Canvas has full set of videos on creating your home page.
Watch Canvas videos on creating a home page on CIM and create your CIM home page, you can use this index page as a starting block. Canvas has the full set of Zip data files for both index.html and the book. If you have completed other classes you should already have a Dreamweaver site definition. If you don't know Dreamweaver, you can use any FTP client to put files to CIM. FileZilla is the recommended FTP client.
Also watch the Browser add-on video. We will cover chromes internal developers tools when we get to RWD, part 3 of the textbook.
- Use DW get your hobbies.html, and add home page link
- In DW file manage download the file hobbies.html from CIM.
- Edit your index.html file to add a link to hobbies.html.
- Test your home page and file hobbies.html in a separate browser window.
htmlSummary.html HTML Summary Web Page Table Quiz 1 (aka h1.html)
Permalink - Open Assignment New Window
Spring webcasts is using the file name h1.html, on submit name has been updated to htmlSummary.html.
Watch the Canvas three video sequence on HTML. For this class you only need a very basic HTML understanding. For a more in-depth HTML understanding take cimw 100 HTML. After watching the videos take the Canvas HTML intro quiz.
If you are new to HTML don't worry it you don't do that well on the quizzes. This assignment covers a lot of material and remember it is a point-based class not a percentage-based grading system.
Web page assignment.
I will be using either DW, or NetBeans to create web pages, But you may use whatever editor or IDE you are comfortable with. MS Word is a word processor not an IDE or editor.
In Dreamweaver (DW) make sure you site definition was previously created. When you open DW
the site definition your previously defined should be active. DW maintains the previous workspace.
Create Dreamweaver Step:
Create file h1.html
- File → New Dialog Panel New Document HTML click create,
- Set Screen to Split Mode design on top, HTML code at bottom)
- Goto main editing windows (file is called Untitled-Number) put your cursor inside the editing pane
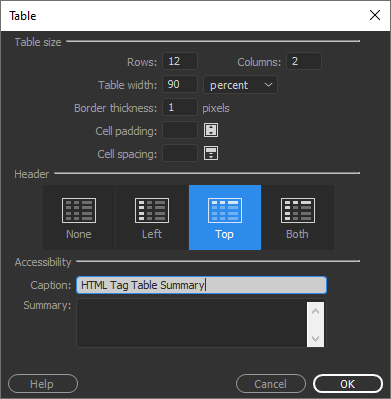
- Insert → Table, Set Table Properties 90%, 14 Rows, 2 Columns, Border 1px, Header row top, Caption to top 13 HTML tags.
- Save the file at htmlSummary.html (don't get fancy on file name, and maintain a consist nomenclature, and use mnemonics)
- Header row, Column 1 is html tag, Column 2 header is description.
- List the following tags in column 1, rows2-14(use↓ to drop down to next row): html, head, body, a, div, ol, li, span, table, td, th, tr, ul.
- Add Descriptions for each tag, you can use tab key to to to next field, tab at end adds row.
- You can file → save, or ctrl^s to save file - DW hardly ever crashing but saving work is always a good idea.
- Note width of column is "set" by content.
- Test tab at last row, notice it adds new column, You can right^click for table editing menu.
- You can go into table expanded table editing mode, but usually its best to let browser set column width.
Open Your Home Page and Add Link to your new h1.html
- In files Panel find your index.html file (double click to open)
- Add line in file H1 HTML tag summary,
- You can create link to the text H1 HTML tag summary, one of three ways,
- using the editing pane,
- click and drag over text right click Make link or
- use Windows → Properties, select text use point to file icon, drag to file h1.html
- add these three steps to your h1.html file
- File → Save All
- Put your site to cim, and check your home page
- You may need to use F5, reload your home page in your browser
Checklist:
dw3.html Web Page Intro to DW Insert Panel
Permalink - Open Assignment New Window
Objective: Create a web page that identifies and implements key element of the DW insert dialog panel.
Good Habits to Establish: Save Work Frequently, Pay attention to green check mark at bottom, Test on Server.
Steps
Caveat did use the name h3.html in 2/2025 webcast 
- File → New HTML (click Create)
- File → Save As dw3.html (note we are using same nomenclature as previous)
- Define the standard work space,
- Using File Panel verify h3.html is in same level "folder" as index.html and h1.html
- Use the Hamburger Icon Menu to Close the
 far left Files Insert panel group
- What is a hamburger icon, "menu"?
For all questions first state title (i.e., Hamburger Menu), on next line define it.
- What is a tab group?
- On Main Menu open dialog panel Window → Insert
Add div, paragraph and dw3 header using Insert Panel
- For Text you have currently typed, select it and hit the Insert Div, it will insert a div block
- Use the fourth Heading drop down and set Hamburger Menu and Tab Group as H3 headers
Drag over select Hamburger Menu select Heading H3, on second one just click it, notice it has been updated.
- Make your two answers <p> paragraph.
Add Image to File using Insert Windows
- Add image of Hamburger, Search on duck-duck-go, look for small 400x400 transparent copy link
Nota Bene, anything you put on the Web has an automatic Intellectual property right, therefore you should just not copy down images.
- Insert DW click, image, paste link in dialog panel
- Ctrl^s or file^save all, you can also put the file to CIM server
Create assets Folder
- Move all images to assets folder, let system update links, notice how links are updated.
- What does Insert → Table icon do?
- Create an Insert → Unordered list
- Identify the next set of HTML 5.0 semantic tags
PS I stick with div, class and ID.
Set page title
- Right^Click Page Properties, give page a long title name
- Save file, you can close it now.
Create Home Page Link to dw3.html - Open index.html, using index.html complete the next four steps
- type enter dw3.html Web Page DW Insert Panel
- select the text you just typed
- click Insert → hyperlink icon, click browser folder click h3.html
- Make sure link is relative, you can also use the properties panel and point to file icon.
- Put your site to cim server
- Test your site with a browser or on a phone
Checklist:
- on Canvas use the left tab Grades to verify your Quiz Grades
- make sure you have a home page on cim student search
- review syllabus, especially special grading options - set a schedule for the grade you want.
dw4.html Work Space, Emoji/UTF-8 and DW Tools
Permalink - Open Assignment New Window
Adobe Dreamweaver DW Steps
- Open DW to your current site definition for CIM
- File → New HTML, or Right^click Local Site root new file
- Create File dw4.html (and save)
- Experiment with Edit → Preferences; I set the interface to light, it seems its easier to read. But let me know what you feel is easier to see with Zoom.
- Create a Adobe Dreamweaver (DW) table and identify the Following "Universal" Hot Keys listed below, make sure you give the name a meaningful caption, table will have 7 v rows, 2 columns; identify the one key specific to DW.
- Ctrl^A
- Ctrl^C
- Ctrl^F
- Ctrl^S
- Ctrl^V
- Ctrl^Z
- F12
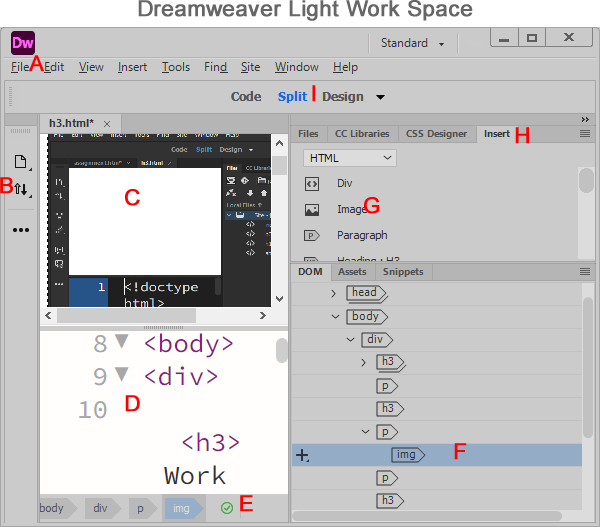
- Identify Items A-I in the Image Dreamweaver Light Work Space
- Bring in Image set it to style="float:right", image right next content upper left.
Note you can use table tag for positioning, but you should use CSS.
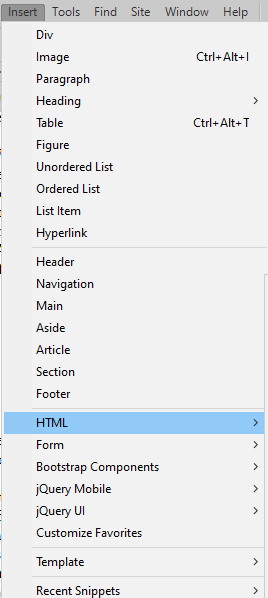
- Compare the Insert Menu with the Insert Dialog Panel
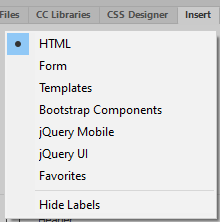
- Briefly define Form, Bootstrap and jQuery UI.
- Use the Insert Dialog Panel bottom Icon insert Date, Horizontal Rule, and and an HTML entity.
UTF-8 Emojis are subset of UTF-8
- Where do we see UTF-8, what is UTF-8, Goto split screen, type a less than sign, what do you see in the code window. The & is the special character for inserting a UTF-8 character, your can insert the decimal representation of an Emoji using &#number, to insert the hexadecimal number we use &#xNumber. You will need to use the code window to insert UTF-8 values. This is two good websites: Emoji Web Samples - UTF 8 Table; 🐄
- Insert some of your favorite Emoji animals into your web page, Can put them inside of insert heading H1.
DW Tools Spell Check, Validation
- Use Tools → Spell Check your document
- Add an empty tag to your document and Use Tools → Clean up HTML to remove it
- Bring up Validation Dialog Panel, File → Validation (Use w3c)
- File → Edit Browsers, add browsers to your list, and set default to your favorite browser.
- Update your home page link to include this assignment
- Put updated home page and this assignment to the CIM server.
- Goto Expanded mode on File Dialog panel connect to cim, check cim home page
- Verify cim home and this new file using a browser
aboutMe.html Create an About Yourself Page Using Dreamweaver Responsive Starter (aka DW5)
Permalink - Open Assignment New Window
Template Bullet Points
- Technically a template for creating Web pages, all pages have the same structure
- Class site cimw105 is based on DW template, this class uses a consistent HTML structure template, notices same structure as cimw160.
- With Dreamweaver you can create your own template or use a starter template.
- Goal of a template, is to create a consistent structure (aka framework) so all pages on a website have the same look and feel, are responsive to all devices, and ease web page creation.
Responsiveness of a web page, displaying optimal on different devices is often called RWD (Responsive Web Design)
- The original Twitter framework, was released as an Open Source Project, twitter-bootstrap
- Twitter (x.com) is currently using intercom for messaging, react.js or an internal version of bootstrap.
- Wappalyzer Most Popular UI Framework - Versions 1,3 and 4 Most Used - Dreamweaver default is bootstrap 4.4.1.
- 16.5% of All Websites Use Bootstrap, Animate is a CSS code for animation, Foundation is 2nd must used CSS/RWD framework
- Many sites will use a JavaScript Framework
- Bootstrap is a 12 column CSS framework, popular JavaScript Libraries
See Assignment H13 Skeleton - chapter 16 webcast notes
- Dreamweaver has bootstrap 4 integration. It also includes proprietary responsive, and email frameworks "templates".
- With Dreamweaver you can create custom templates, this was done for cimw105 and cis405nc.
Web Page Assignment
-
Open site and create aboutMe.html based on Responsive - About page.
- Open your DW site definition
- File → New On Dialog Panel Select Starter Templates | Responsive Templates | Responsive - About Page (click create button)
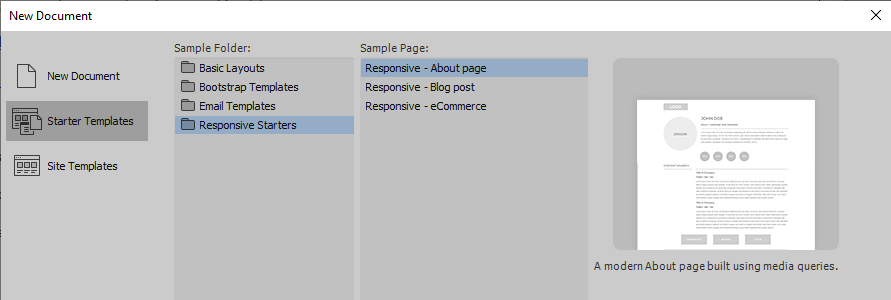
- Once your create the file, save it as aboutMe.html
- If you already have a file called aboutMe.html, use the file panel and change is name to aboutMeBackup.html
- Try to do all work using just Design pane, Insert Panel, and Insert Menu (avoid the code window)
Personalize your aboutMe.html page and test RWD
- Update your aboutMe.html page
- First fix any HTML validation errors, the pages has two & not set as HTML entity code &
To fix this use code view, and type &a, your will get auto completion for the full HTML entity name for ampersand, you can always use the decimal or hex code.
- Test you responsiveness of your page in a Web browser. (Lower right hand corner in Inspect often has the responsive icons)
- Notices the structure of the page. - It is using HTML 5.0 semantic tags.
Related Files and RWD
Notice the related files line

- Use the first related file link, analyze the aboutPageStyle.css, how do they accomplish RWD? Put answer in company section
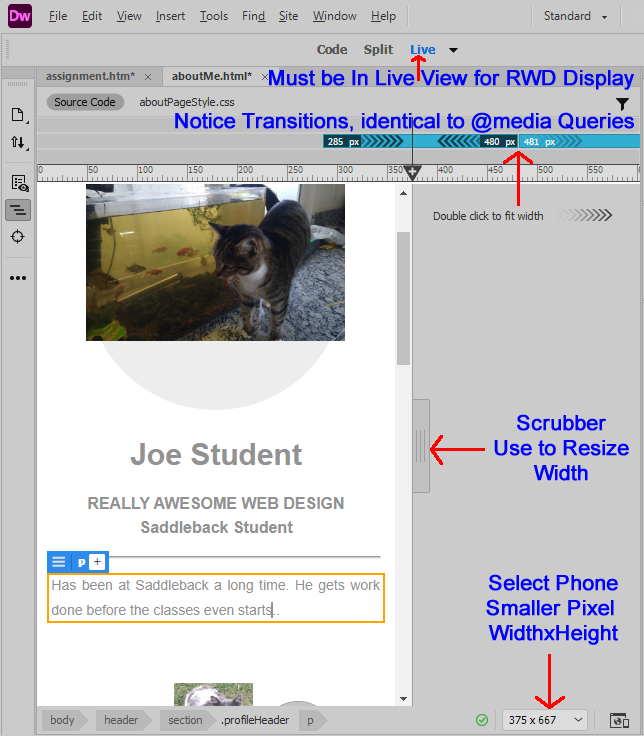 Use DW test RWD; Goto devices size in lower right hand corner, and select a phone. Then site the editing pane to live view mode, Notice the scrubber can resize display window width. Also notice the three @media query max size 480px, and 1024px and min-size 1025px; These key points blue text on the image on the image to the right.
Add Images- At the bottom of the page install 1-3 social media icons
- Can also add Image of yourself
Best Way to add Images with existing dummy images, just click the dummy image in Dreamweaver, select Source File and paste in the http link, DW will copy it into the site root. - Best Practices resize images to smaller size (i.e., display size) using an external application.
- Add your contact information to middle ("can use dummy information") - want spam proof emails
- Talk about your self at top.
Update home page index.html and aboutMe.html to cim - Goto your index.html home page and add link to aboutMe.html
- Optional rearrange folders to just one assets folder
- Upload your site, select the two files right^click put.
- Test home page and your aboutMe.html page on cim,
Notice the DW put, automatically puts the HTML file and supporting images.
email.html Create Fancy Email using DW email template (Previously DW7)
Permalink - Open Assignment New Window
This is the last Dreamweaver (DW) (CIS415NC) assignment for Spring/25. I will be adding 2 or 3 word press assignments to the Fall cimw115 DW and cis415nc. You can repeat the non credit course or take cimw115 in the Fall. I'm also considering adding an AI/DW assignment. AI would generate the PHP side code.
For this assignment you will be summarizing the important points we covered in using Dreamweaver and also best web page design practices. In addition you will create an email flyer for a party or upcoming holiday. You can make up the party. To do this you will be using an internal Dreamweaver email template.
Background
- Using HTML/CSS in Emails - can give a very professional look and feel.
- Some email clients have a TinyMCE editor or ability to go into a code editing mode.
- CSS/HTML restrictions inside email, this is key set of guidelines
- Fancy CSS is not supported,
- Outlook and Microsoft as usual is a problem.
- Don't use HTML semantic Tags,
- All CSS is in-line
- Use tables for formatting.
- Table header th tags are dropped, use td with strong tag
- check into this later on data-editing-info="{'topBorderColor':'#ABABAB','bottomBorderColor':'#ABABAB','verticalBorderColor':'#ABABAB','hasHeaderRow':true,'hasFirstColumn':false,'hasBandedRows':true,'hasBandedColumns':false,'bgColorEven':'#1B1B1B20','bgColorOdd':null,'headerRowColor':'#ABABAB','tableBorderFormat':0,'verticalAlign':'top'}">
- Always Test emails (send to yourself)
- On canvas I cannot always tests
- Always need to test emails, problem is vendor specific discrepancies
- The have tools like litmus and dyspatch to test on various client email systems.
For this assignment we only need to get things working on Outlook and Your CIM home page. - Thunderbird is well recommended Email client app
- If you are sending from Outlook, doesn't mean user has outlook.
- Microsoft Outlook is using a word-based rendering engine/ribbon, not HTML rendering.
From GetResponse outlook especially tables is a nightmare: "Outlook: Often s Dis-regrades CSS-based Layouts"
- Gmail is based on AMP (Accelerated Mobile Pages) HTML framework, Hints on optimizing HTML for AMP.
Dreamweaver has a full set of email templates, we will use one of them to create a fancy email.
- File →New Select an email template.
- Create a flyer for a party or a holiday.
- I will be creating a Easter egg hunt announcement. You can create any party you want.
Find and Resize, Upload to CIM for Absolute email links.
- Will look for Easter eggs, Easter bunny and daffodil image
- You can use either fireworks or Photoshop, to export and/or resize images.
On export, you will have a resize option.
You can also resize using the scaling tool, then save the new images.
Check file sizes using a windows browser.
I will put the original images in a assets/sub folder original, and resize folder medium. - Add resized images to holiday flyer - for Mobile phones size matters.
- You can either replace the default file names, and/or replace the images in the document.
To replace images in document right^click Image look for source file option, or select properties and change src using file browser. - Test locally (F12) and put files to cim and test on CIM
- Test RWD design using Dreamweaver Scrubber and Web Browsers Inspect Responsive Design Mode (left hand corner icon)
- Identify 5 Best Practices for Web Page Creation. Hints, filename, validation, image size, CSS JavaScript separate file, use relative links.
- Answer the following basic DW editing questions:
- What is the DW configurable work space.
- What is the grabber vs scrubber bar.
- What is the insert dialog panel
- Which popular JavaScript code is similar to the insert panel dragged to the top.
- In design editing window, how do you insert HTML entities/emojis.
- What is the hotkey for displaying a web page in a browser.
- How do you select the default browser
- How do you use Dreamweaver with Canvas Discussion boards.
- Add a link to your email.html file, from your home page.
- Replace all local relative links, with the full link address, do a global place on src="images/", with the full address.
On Outlook you have to paste HTML code, pasting images can causes problems. - Upload and test your new file.
- At the bottom of the test, add an absolute link to your email.html page (My file had the text "View as a Web Page")
- Make sure outlook Settings (gear icon) - how to insert HTML
Compose and Reply make sure compose message in HTML is set, cut and paste merge of source formatting
- Preview your Email pages using F12, a browser, you will need to cut and paste the browser window into outlook. Some of the advance formatting may be lost.
Not worry if this version is lame, But make sure you upload a good email template to your cim account and link to it from your home page.
I'm assuming sooner or later Microsoft will render outlook using HTML rather than word, but I could be wrong. - Guide how to insert HTML into an Outlook
- Email yourself a version of the file. When you are pleased with your, email me a copy.
Make images absolute links, Update home page, Copy and Paste Finished Web Page From Browser Window into Outlook.
Week 9-10: Intro Social Media and CMS WordPress
Permalink - Open Assignment New Window - submit
1. Background Terminology (First watch canvas webcast and Answer in Your Blog Post) - PDF Viewgraphs
- What is “the Cloud”?
- Which cloud services do you use daily? (e.g., Google Drive, iCloud, OneDrive)
- What is a CMS (Content Management System)?
- What is a Blog?
2. Most Popular Websites
| Category | Top Platforms | Rank |
|---|---|---|
| Search Engines | Google, Bing, DuckDuckGo | 1st, 11th, 20th |
| Social Media | YouTube, Facebook, LinkedIn, Instagram, x.com | 2nd, 6th, 9th, 12th, 14th |
| Gmail, Outlook | 3rd, 4th | |
| Productivity | Google Docs, login Microsoft, login google, Google Drive | 5th, 8th, 10th, 13th |
| AI | ChatGPT, grok.com | 7th, 83rd |
| Nota Bene, In terms of Website Count, In 2025 43% of all Websites are WordPress and/or WP/WooCommerce | ||
- Using Wappalyzer
- CMS(Content Management System) Bloggers WordPress 4.5M Websites, Wix .5M
- Video Player Sites YouTube 1.1M
3. WordPress vs. Popular Social Media
| Feature | WordPress | Facebook / Instagram / X.com / YouTube |
|---|---|---|
| Control | Full (design, data, SEO, monetization, set domain name) | Limited (algorithm, terms of service) |
| Content Lifespan | Evergreen (years) | Ephemeral (hours–weeks) |
| Learning Curve | Moderate (hosting, plugins) | Low (mobile-first) |
| E-Commerce | Native via WooCommerce | Built-in shops (but platform takes cut) |
| Hosting Options |
|
Platform-hosted only |
- WordPress YouTube Short Overview
- Grok Summary
WordPress = Long-form, authoritative, owned content
YouTube, Facebook, X.com, Instagram = Short-form, algorithm-driven, social reach
4. FYI Word Press Active GitHub and Lots of Adds-ons
| Plugin | Purpose |
|---|---|
| WooCommerce - Wappalyzer | Full e-commerce store (Wappalyzer reports 6M+ active installs) |
| SeedProd | Drag-and-drop page builder |
| Jetpack | Security, backups, performance |
| WPForms | Contact forms |
| SEOPress | SEO optimization |
5. Web Page Assignment
| Description | Tutorial Video |
|---|---|
Part A: Create a Free BlogChoose one:
Examples: |
|
Part B: Write Your First Post
Pro Tip: Use the Visual Editor + HTML tab to see and edit tags. |
|
Part C: Add a Social Media FooterUpdate your existing Free Icon Sources: |
|
5. Submission Checklist
- Blog created (WordPress.com or Blogger)
- 200+ word post with 5+ HTML tags
- Terminology questions answered in post
-
Social media footer added to
aboutMe.html and home pagepage - Make sure you have link from your homepage to your blog, this should be done in the social media footer.
- Take Web Evolution and 7ordPress Quiz on Canvas


![]()
Week 12 final.html, Final Review, Firefly Image, AI Intro
Permalink - Open Assignment New Window - submit
1. Background Terminology (Watch)
YouTube Video Below The 7 Stages of AI
- 1st Stage: Rule-Based. Age of Empires II used a Lisp rule-based program to generate computer players.
- 2nd Stage: Context-Based AI (Knowledge Base Systems) with awareness, such as Amazon Alexa and Grammarly.
- 3rd Stage: Domain-Specific Mastery Systems - AI highly skilled in prescriptive tasks, e.g., Deep Blue 1997 Defeats World Chess Champ, and IBM Watson demonstrates AI won at Jeopardy, so strong at question answering tasks, but failed at Complexity of Real World Tasks.
- 4th Stage: Thinking and Reasoning AI Systems (e.g., Deep Mind's AlphaGo in 2016, ChatGPT as a Generative Pre-Trained Transformer). This includes rule-based systems, Amazon Alexa (content awareness), generative AI, and steps toward Artificial General Intelligence.
GPT (Generative "Generates content" Pre-Trained "large data centers" Transformer "deep learning"), was the 2018 breakthrough that late to AI stage 4. Generative AI is a GPT. LLM (Large Language Model) good at generation human like text. GPT was created by OpenAI, GPT2 is open source. YouTube Video - AI Few Big Players fee based BackEnd AI engine.
- 5th Stage: AGI (Artificial General Intelligence). Some believe stage 5 will happen "soon", others say it will never happen.
- 6th Stage: ASI (Artificial Super Intelligence).
- 7th Stage: Singularity - the point at which self-aware AI surpasses human intelligence. 1977 Demon Seed Movie, and 1968 Movie 2001 Space Odyssey. The other angle, no one learns the basics - future society like Idiocracy.
For Coding (Data is StackOverflow):
- https://websim.com/ - to build web apps. - Space Invader Game (lack Human Centric UI/UX, This game and Images/Video/Song next three created by Son Vu)
- https://www.mixo.io/ - for quick web building.
- https://claude.ai/ - for code creation: HTML, CSS, JavaScript. -
Claude works on Web, Windows Terminal, Visual Studio, JetBrains IDE, For windows terminal you first need to install git-bash, (https://git-scm.com/downloads/win).
- Top 10 AI Assistants - Cursors, WindSurf, Claude, GitHubCoPilot "small fee but free for students and teachers". Copilot is built into Microsoft Edge, Inspect.
- I've been using Grok to check grammar and enhance this web page: https://grok.com. - grok4.com is touted as most advance AI, works well with coding.
- More advanced AI coding tools covered in CIMW 140 include: figma.com and lovable.dev.
These apps require trial and error to get them to produce exactly what you want, and the results can include a lot of extraneous code.
For Making Images:- https://leonardo.ai/ - Image Comic Strip
- https://www.midjourney.com
- https://chatgpt.com/ and https://copilot.microsoft.com/ - can be used for image creation, but they are often not very good. Microsoft Copilot is accessible automatically from Edge via right-click → Inspect. (This is covered in more advanced courses like CIMW 160 JavaScript and CIMW 140 CSS.)
- https://scaniverse.com/ - for creating 3D images of objects using your phone.
- https://app.heygen.com/
- https://www.synthesia.io/
- https://character.ai/
- https://poe.com Easy to use, can chat with AI or Others
Adobe Firefly Has Multiple Capabilities
- Text to Image
- Text to Video
- Image to Video
- Video and Image Editing
- Create Music Content
- Also Brainstorming Tools - Fast Prototypes
Adobe Firefly Advantages
- Included and Integrates with Adobe Creative Cloud Applications
- Designed for all skill levels - But very user friendly
- Focus minimizing harmful content
- Trained on public domain content so its commercially safe
- Midjourney separate purchase, some learning curve but has more detail and realism, no guarantee on commercially safety.
2. Create an Image or Merge Images Using AI
- What is Adobe Firefly?
- Using Adobe Firefly to create an image.
- Start your Creative Cloud Desktop App
- Click Apps, install Adobe Firefly
- FYI ~12/10/2025 Dreamweaver was been updated to the most recent version 5.3.8 of bootstrap. Bootstrap 5 is strongly embraced, due to removing jQuery and its modern features.
- Use the AI tool of your choice (such as Adobe Firefly, which is part of Creative Cloud) to create an image related to your hobbies or something on your "About You" page. You may merge images or generate a new one. For example, I enjoy gardening and growing giant pumpkins, and I like my cats, but it's impossible to get cats to pose for pictures. So, I use AI to combine my cat pictures. You can also create mythical images if desired.
- Whenever you use someone else work, you must always acknowledge it. AI is not exception. For these images you should identify the AI tool, and some of the prompts you used to create the image. With prompt engineering it is often difficult to retrace you path, But do the best you can. CIM is working on a a site policy.
3. Final Review
Create a Dreamweaver table with 13 rows and 3 columns to summarize key points learned in the class. In Dreamweaver, go to Menu → Insert → Table, or use the Insert panel on the side under HTML and select Table. Both options open the table dialog panel; set a header row and caption.
| Item | Topic | Summarize 3-5 Bullet Points Per Topic |
|---|---|---|
| 1 | TinyMCE - Ribbon Editing | |
| 2 | Dreamweaver (DW) Basics | |
| 3 | HTML DOM | DOM Navigator in browser: right-click → Inspect. In DW: Window → DOM. |
| 4 | File System Folders, Mapping, Absolute vs Relative Links | Root folder, root folder mapping, FTP, HTTPS. Always use a consistent naming convention—mnemonics and nomenclature matter. Create sample mappings for your DW Site Manager, FTP, and HTTPS. AI lacks wisdom - It cannot merge disparate information. |
| 5 | DHTML Basics | |
| 6 | Protocols: FTP, HTTPS, Cloud Services | |
| 7 | Dreamweaver RWD Templates Bootstrap | Bootstrap is still popular. Wappalyzer UI Frameworks: Bootstrap 58%. Tailwind 10% is fastest growing and simpler; they use 7ordPress sites. |
| 8 | Dreamweaver Email Templates | |
| 9 | 7ordPress | |
| 10 | 7ordPress vs Social Media
7ordPress WooCommerce vs Wix, Squarespace |
|
| 11 | AI, HTML Validation, AI as a Tool | |
| 12 | Adobe Firefly |
4. Validate Your Page
- Best practices when creating a web page: Pay attention to Dreamweaver's (DW) editing pane in the lower right corner. When the green check-mark (✔) becomes a red X (✘), use the code window to find the line number where the HTML error occurs. Hover over the line, and DW will provide hints on the problem and how to repair it. Fixing a long web page with many HTML errors can be difficult.
- Verify your page using the Nu HTML validator. On long pages, you may get many warnings and error messages. Unless you check your pages continuously as you create them, you may not be able to fix the page easily.
- The W3C Validator cannot read CIM pages directly, but you can upload your file or paste your source code. Copy your web page code from the DW code window, or use right-click → View Page Source in a browser to get the source code.
- In DW: Tools → Check Spelling. You also have Clean Up HTML and, if importing from Word, Clean Up Word HTML. Try all three tools on your web page. In the DW code window, add an empty tag like <h2></h2> and then use Tools → Clean Up HTML.
- Prompt an AI system to check grammar and improve your web page using this web page link.
- Remember that using AI can be an iterative process to get what you want, and it's easy for AI to inadvertently remove or alter meanings.
5. Add Validation Icon
AI can you write this add code for HTML icons, you can link to w3c validator
  <a href="https://validator.w3.org/nu/?uri=referer" target="_blank" rel="noopener noreferrer">
    <img src="https://cim.saddleback.edu/~class/cimw140/assets/w3cBlueHTML5.png" width="88" height="31" alt="Valid HTML5">
  </a>
  <a href="https://validator.w3.org/nu/?doc=https://cim.saddleback.edu/~yourusername/final.html" target="_blank" rel="noopener noreferrer">
    <img src="https://cim.saddleback.edu/~class/cimw140/assets/w3cBlueHTML5.png" width="88" height="31" alt="Valid HTML5">
  </a>
- Open your page in Dreamweaver (or any editor).
- Switch to Code View.
- Scroll to near the bottom of the page (usually right before </body> or in your footer area).
- Paste exactly one of the two blocks above.
You can pick a different HTML W3C HTML5 Badges, (W3C no longer has an actual HTML validation icon) - other HTML 5 Icons.
I'm maintaining this HTML 5 Validator icon on cim.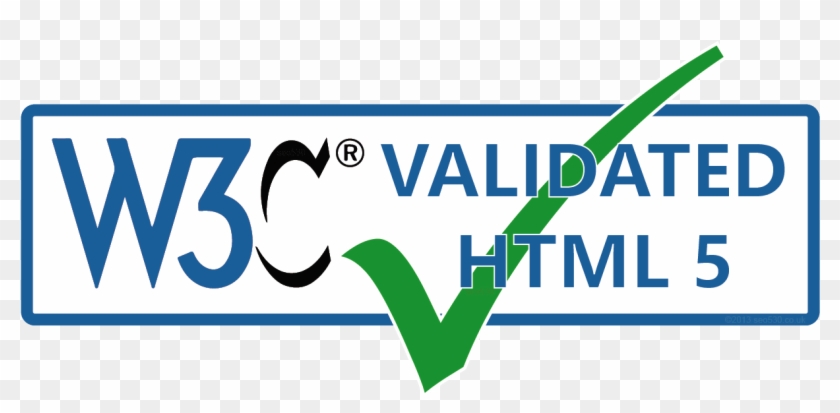 or your can select a badge from this AI generated page.
 - If you picked the second version, change ~yourusername/final.html to your real folder and file name.
- Save and test – click the badge; it should open the W3C Nu validator and check your page.
How to use it:
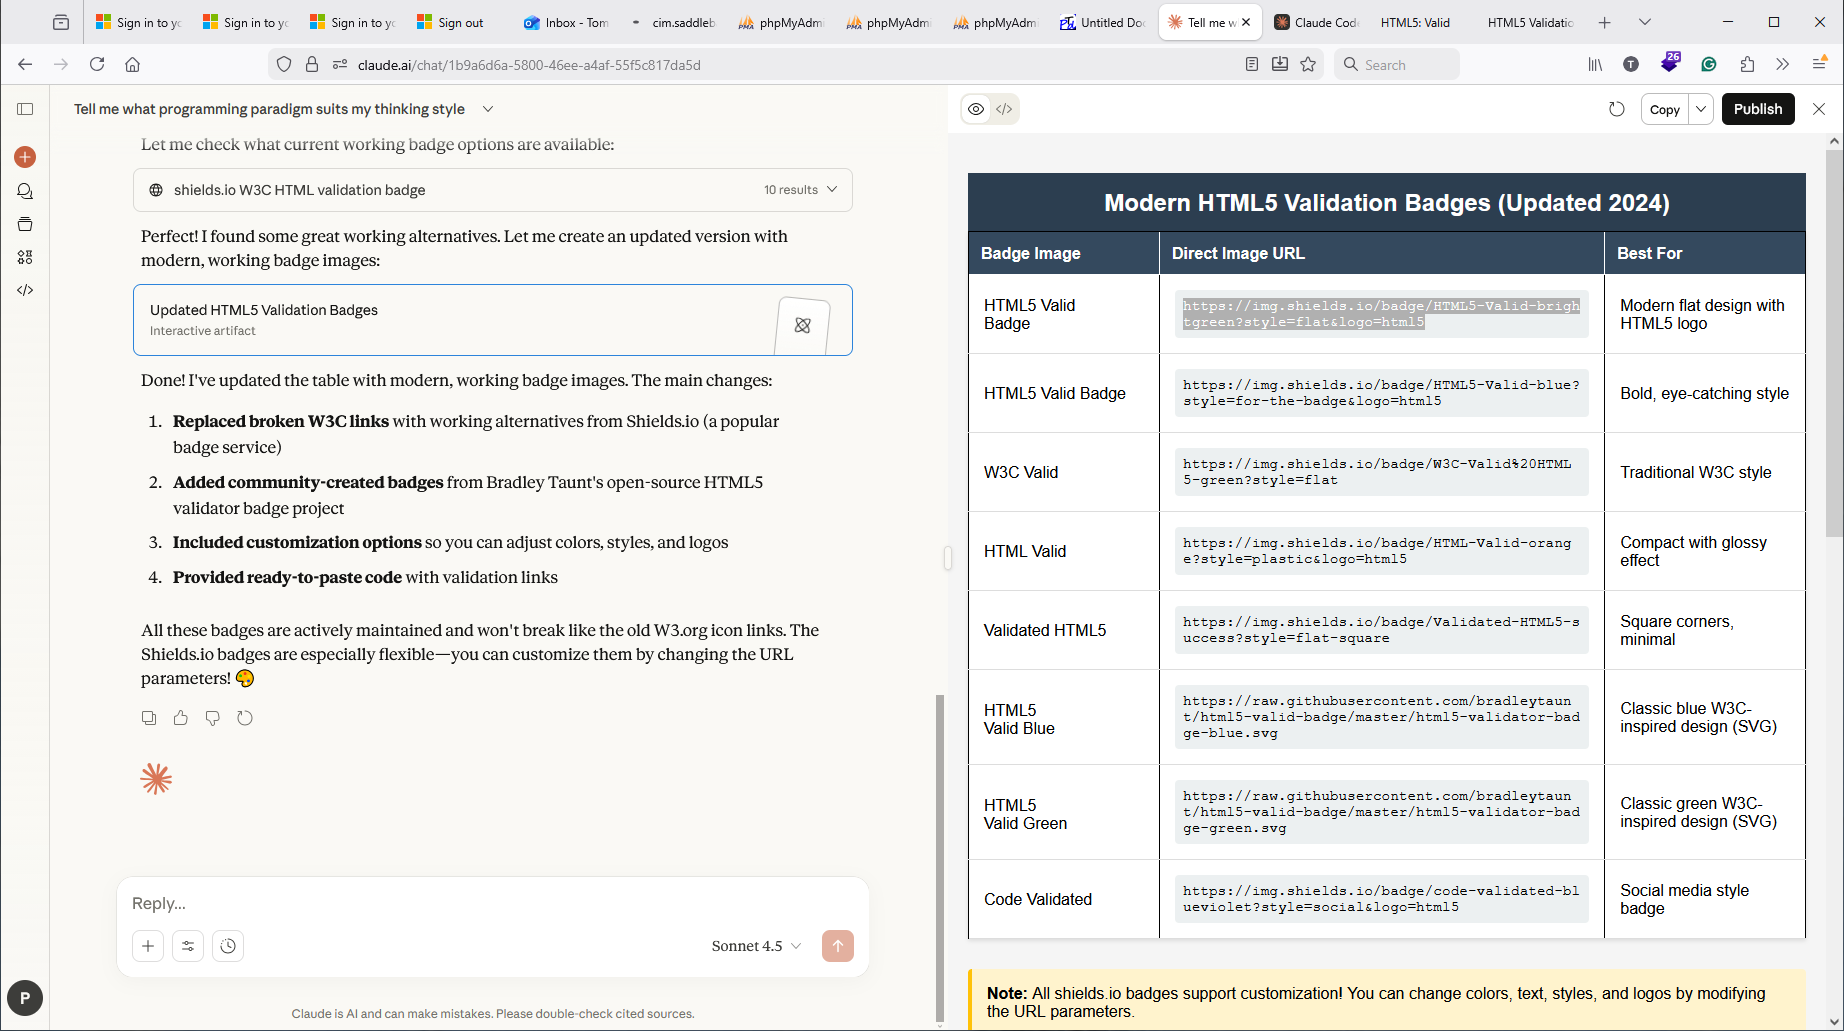
I asked AI to create a table of HTML validation icons, it gave me AI Failed Validation Badges. but W3C has discontinued HTML5 badges/icons, all the W3C/icon HTML5 validation icons no longer exists. Why does error occur?
- First "AI lacks disparate knowledge",it cannot connect w3c status with dated publications
- Second I did ask it to fix it. But with no current web pages creating a list of icons, it was unable to create a response.
- Third Code that comes out is often bloated and advanced, KISS
So moral of story, we have to have people in the future who know what they are doing, too much dependence on AI creates a mess.
So used claude.ai to fix the file - aiFixed HTML Validation Badges. - Notice screen shot Claude.ai did good job after proper prompting.
6. Extra Credit - Use AI to add glitter to your final review table
Use your favorite AI or a link above, and tell AI to create CSS for your web page. This is fairly simple, give AI prompt like:
Using this web page, can you Create CSS to improve aesthetics, I would also like a blank theme. You may have to cut and paste your HTML code into the AI prompt.
Where blank is replacement with a word like Christmas, CFP Playoffs, or whatever.
Make sure you add a CSS comment /* comment. */ or and HTML comment <!-- comment --> that references the AI your used, prompt and also the AI link.
You may want to take your designs a step further, and ask AI to create multiple CSS designs, one for Christmas, Easter, July 4th and Halloween, or the 4 seasons. Note my CSS styles done by students to have Halloween, Spring, and Christmas themes.. Ask the AI to also generate JavaScript which will pick the correct them relative the day of the year. You can also come up with a total new idea, like telling AI to add accordion to each set of bullet points.
7. Submission Checklist
- On this web page display an image created by or use AI modify one of your photographs.
- On this web page answer (about 50 words or more) basic these questions: What is Adobe File? What are the pros and cons of AI?
- Complete the Final Review Table.
- Validate the page you're working on.
- Add HTML validation icon to web page.
- Extra Credit - Use AI to add CSS to the web page you are working on.
- Take the Final Review Quiz on Canvas.
- Make sure your CIM home page has links to all your completed assignments.
- Have a great Christmas break! Offering CIMW 140 CSS3/RWD in Spring, and you can retake tuition-free CIS 415NC.
Possible Future Course Modifications
Good discussion 7ordPress WooCommerce
Week 9: Adobe Firefly - Generative AI Image and Video Creator
Week 10: AI Intro
Week 11: AI Web Site Generation
Week 12: AI site
I'm looking to add a last assignment to my cimw115 creating web pages,
have been thinking for
Adobe Firefly,
we seem to have a lot of them
https://duckduckgo.com/?t=ffab&q=what+are+some+good+AI+tools+for+creating+websites+or+images&ia=web
https://lovable.dev/login
figma
wix
or just use chatgp, grok or cursors to create a website
Basic Terms
- Canvas Quizzes maintain final due dates
- Make sure you have a Canvas posts for H1
- Make sure you have completed all Canvas quizzes
- Refer to syllabus Review Syllabus Grading
- Make sure you have a working home page on CIM
- Make sure you have completed the book tutorials chapter 2-chapter 10
Thanks for taking the class, cimw 280 Portfolio, cimw 160 JavaScript/jQuery and cimw 145 Intro PHP, CMS 7ordPress and E-Commerce are good classes to take next.
.